Deploying Your First Smart Contract on Base: A Whimsical Guide
Looking to learn about deploying your first smart contract on Base Blockchain? Here’s your complete guide.

GM, Buidlers! Ready to dive into the wonderful world of smart contracts and put your code on the blockchain? Well, you've come to the right place.
Today, we're going to guide you on how to deploy smart contracts on Base Sepolia Testnet using 3 tools: Remix, Foundry & Hardhat.
Buckle up, because we're about to make deploying your first contract on Base Sepolia testnet as easy as pie (or at least as easy as coding can be).
Welcome to Remix Land
First things first, let's talk about our trusty sidekick for this adventure: Remix. This online IDE is like the Swiss Army knife of smart contract development. It's perfect for beginners because it spares you the hassle of setting up a local development environment. Plus, it comes with a built-in blockchain simulation! But remember, this simulated blockchain lives only in your browser, like a digital Narnia – so don't expect to invite your friends over to explore it.
In this guide, we'll cover the ins and outs of Remix and show you how to deploy a contract to the Base Sepolia testnet.
Ready to get your hands dirty? Let's do this!
Objectives: What You’ll Master by the End
By the end of this tutorial, you’ll be able to:
1. Deploy a smart contract on Base Sepolia testnet using Remix, Hardhat & Foundry.
2. Learn how to interact with the contract.
A Quick Tour of The Remix Window
1. Editor Pane:
This is where your code comes to life. You'll write, edit, and compile your smart contracts here. If you see any (!) signs, it means there's an issue in your code that needs attention.

2. Terminal/Output:
This section displays logs of your transactions and any errors that occur. It's essential for tracking what's happening with your contracts and debugging issues.

3. Left Panel:
The Left Panel is your main navigation hub. You can switch between different tools and plugins, manage your files, and debug your contracts. It provides easy access to everything you need to develop and test your smart contracts.
4. Plugins:
In Remix, most features are available as plugins, and the most commonly used ones are active by default. You can manage plugins by clicking the plug icon in the lower-left corner, just above the settings gear. From there, you can activate or deactivate plugins as needed. Some plugins, like the Debugger, may automatically activate when required by other parts of the editor.
5. Solidity Compiler
The Solidity Compiler is one of the default plugins you'll frequently use. Make sure to enable the Auto compile option. Since smart contracts are usually small, auto-compiling won't impact performance significantly.
The Compile and Run script button in this plugin can be a bit confusing. It's not typically used for running tests on your contracts. You can click the information icon (i) for more details about this feature.
Secure Your Base Chain Smart Contracts with QuillAudits
Secure Your Base Chain Smart Contracts with QuillAudits
Ready to secure your Base Chain Smart Contracts? Take the first step towards a safer blockchain journey. Request an Audit with QuillAudits today & ensure your contracts are robust and secure!
Deploying the Storage.sol Contract
Let's get down to business. Start by opening remix.ethereum.org and create a new file named Storage.sol in the contracts folder of your default workspace. This is where the magic happens!
Here's a simple Storage.sol contract to get you started:

This contract is like a digital notepad that stores a number. Not exactly rocket science, but it’s perfect for learning the ropes!
Preparing for Deployment: Enter the Wallet
Before we deploy our contract, we need a wallet. Think of this as your digital passport to the blockchain world. If you don’t have one, set up a Coinbase or MetaMask wallet. Remember, always use separate wallets for development and real funds – you don’t want a bug draining your life savings!
Once your wallet is set up, add the Base Sepolia network to it. This is like setting your GPS to the right destination. You can get some testnet Ether from a faucet like this, just follow the instructions.

Deploying to Base Sepolia Testnet
With your wallet loaded with testnet Ether, head back to Remix. In the Deploy & Run Transactions panel, select "Injected Provider" under Environment. Your wallet will ask for permission to connect to Remix – go ahead and approve it.

Now, make sure the network is set to "Custom (84532)" for Base Sepolia. If everything looks good, hit that big orange Deploy button. Your wallet will pop up asking for confirmation. Double-check everything (especially the gas fees – even testnet Ether isn’t infinite!) and click Confirm.
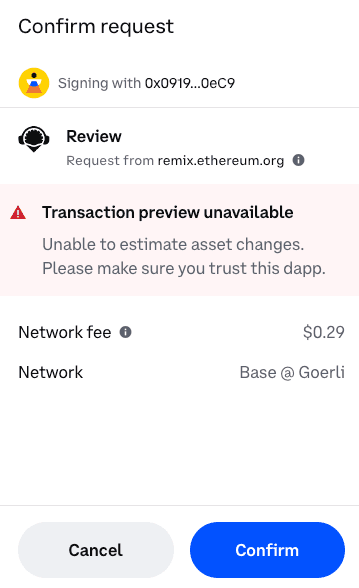
Congrats! You've just deployed your first smart contract on the Base Sepolia testnet. Now you can view it on sepolia.basescan.org by searching for your contract address.
Verifying and Interacting with Your Contract
Want to make your contract more user-friendly? Verify it on Etherscan by clicking the "Verify and Publish" button. This will map your contract's functions and variables to the human-readable names in your code, making it easier to interact with.

Once verified, you can play around with your contract on Etherscan. Just head to the "Read Contract" section to test out the retrieve function, or use the "Write Contract" section to store a new number.

Now Let’s Deploy a Smart Contract on Base Sepolia Testnet Using Foundry
Foundry is a powerful suite of tools designed to streamline the development, testing, and deployment of smart contracts. In this tutorial, we'll walk through deploying a smart contract to the Base Sepolia testnet using Foundry. Before pushing contracts to mainnet or even production testnets, it's crucial to ensure their security through rigorous smart contract auditing.

Overview of Foundry Tools
- forge: The core tool for developing, testing, compiling, and deploying smart contracts.
- cast: A command-line tool for interacting with Ethereum RPC, sending transactions, and retrieving on-chain data.
- anvil: A local testnet node for testing contract behavior.
- chisel: A Solidity REPL for experimenting with Solidity code.
With Foundry, you'll write contracts, tests, and deployment scripts all in Solidity, benefiting from fast feedback loops thanks to its Rust-based implementation.
Take a Look at The Prerequisites
Foundry: Install Foundry with the following commands:
1curl -L <https://foundry.paradigm.xyz> | bash
2foundryup
3
For more details, refer to the Foundry Book installation guide.
- Coinbase Wallet: Download and set up Coinbase Wallet for deploying contracts. Ensure your wallet is funded with ETH to cover gas fees. For Base Sepolia testnet, use a faucet to get test ETH.
Creating a Project
Create a new directory and initialize a Foundry project by using these commands one by one
1mkdir myproject
2cd myproject
3forge init
4
Here is the basic layout of the foundry project created:
1.
2├── foundry.toml
3├── script
4│   └── Counter.s.sol
5├── src
6│   └── Counter.sol
7└── test
8    └── Counter.t.sol
9
Writing and Compiling the Smart Contract
Create an NFT Smart Contract: Replace the content in src/Counter.sol with the following ERC-721 NFT contract:

Install OpenZeppelin Contracts:
1forge install openzeppelin/openzeppelin-contracts
2
Compile the Contract:
1forge build
2
Configuring Foundry with Base
Store Your Private Key: Import your private key into Foundry's keystore:
1cast wallet import deployer --interactive
2
Make sure you do not commit this key to any public repository.
Add Base Network Configuration: Create a
.envfile with the following content:1BASE_MAINNET_RPC="<https://mainnet.base.org>" 2BASE_SEPOLIA_RPC="<https://sepolia.base.org>" 3ETHERSCAN_API_KEY="<YOUR API KEY>" 4Load environment variables:
1source .env
2
Deploying the Smart Contract
Deploy to Base Sepolia Testnet:
1forge create ./src/NFT.sol:NFT --rpc-url $BASE_SEPOLIA_RPC --account deployer
2
Enter the password for the
deployeraccount when prompted.(Optional) Deploy to Mainnet:
1forge create ./src/NFT.sol:NFT --rpc-url $BASE_MAINNET_RPC --account deployer
2
Verifying the Smart Contract
Verify the Contract on BaseScan:
1forge verify-contract <DEPLOYED_ADDRESS> ./src/NFT.sol:NFT --chain 84532 --watch
2
Replace
<DEPLOYED_ADDRESS>with your contract's address.You will receive a response with verification status, such as
Pass - Verified.
Interacting with the Smart Contract
Perform a Call:
1cast call <DEPLOYED_ADDRESS> --rpc-url $BASE_SEPOLIA_RPC "balanceOf(address)" <YOUR_ADDRESS_HERE>
2
You should see the balance of your account, which should be zero initially.
Sign and Publish a Transaction:
1cast send <DEPLOYED_ADDRESS> --rpc-url=$BASE_SEPOLIA_RPC "mint(address)" <YOUR_ADDRESS_HERE> --account deployer
2
Confirm NFT Minting: Run the call command again to verify the balance reflects the new NFT.
1cast call <DEPLOYED_ADDRESS> --rpc-url $BASE_SEPOLIA_RPC "balanceOf(address)" <YOUR_ADDRESS_HERE>
2
And the response: 0x0000000000000000000000000000000000000000000000000000000000000001 (1 in hex) — you deployed a contract and minted an NFT with Foundry. GG!
Here's How You Deploy a Smart Contract to The Base Sepolia Testnet using Hardhat
Make Sure You Install Node.js v18+
Ensure you have Node.js version 18 or higher installed. If you are using nvm to manage Node.js versions, you can install Node.js v18 with:
1nvm install 18
2
Creating a Project
Initialize a Node.js project:
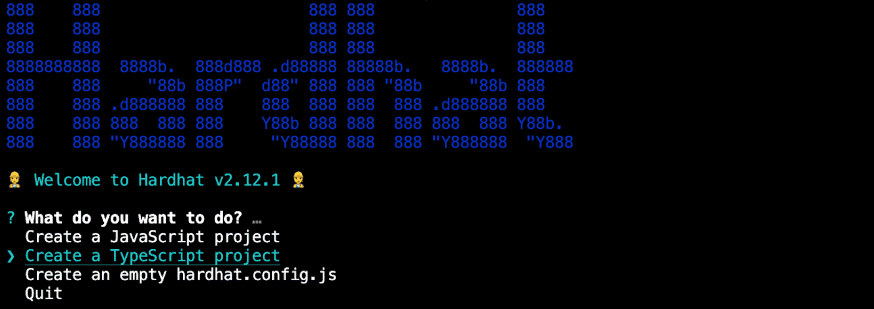
1npm init --y
2
Install Hardhat and create a new Hardhat project:
1npm install --save-dev hardhat 2npx hardhat init 3- Select Create a TypeScript project and confirm the project root.
- Choose Yes for adding a
.gitignoreand loading the sample project.
Configuring Hardhat with Base
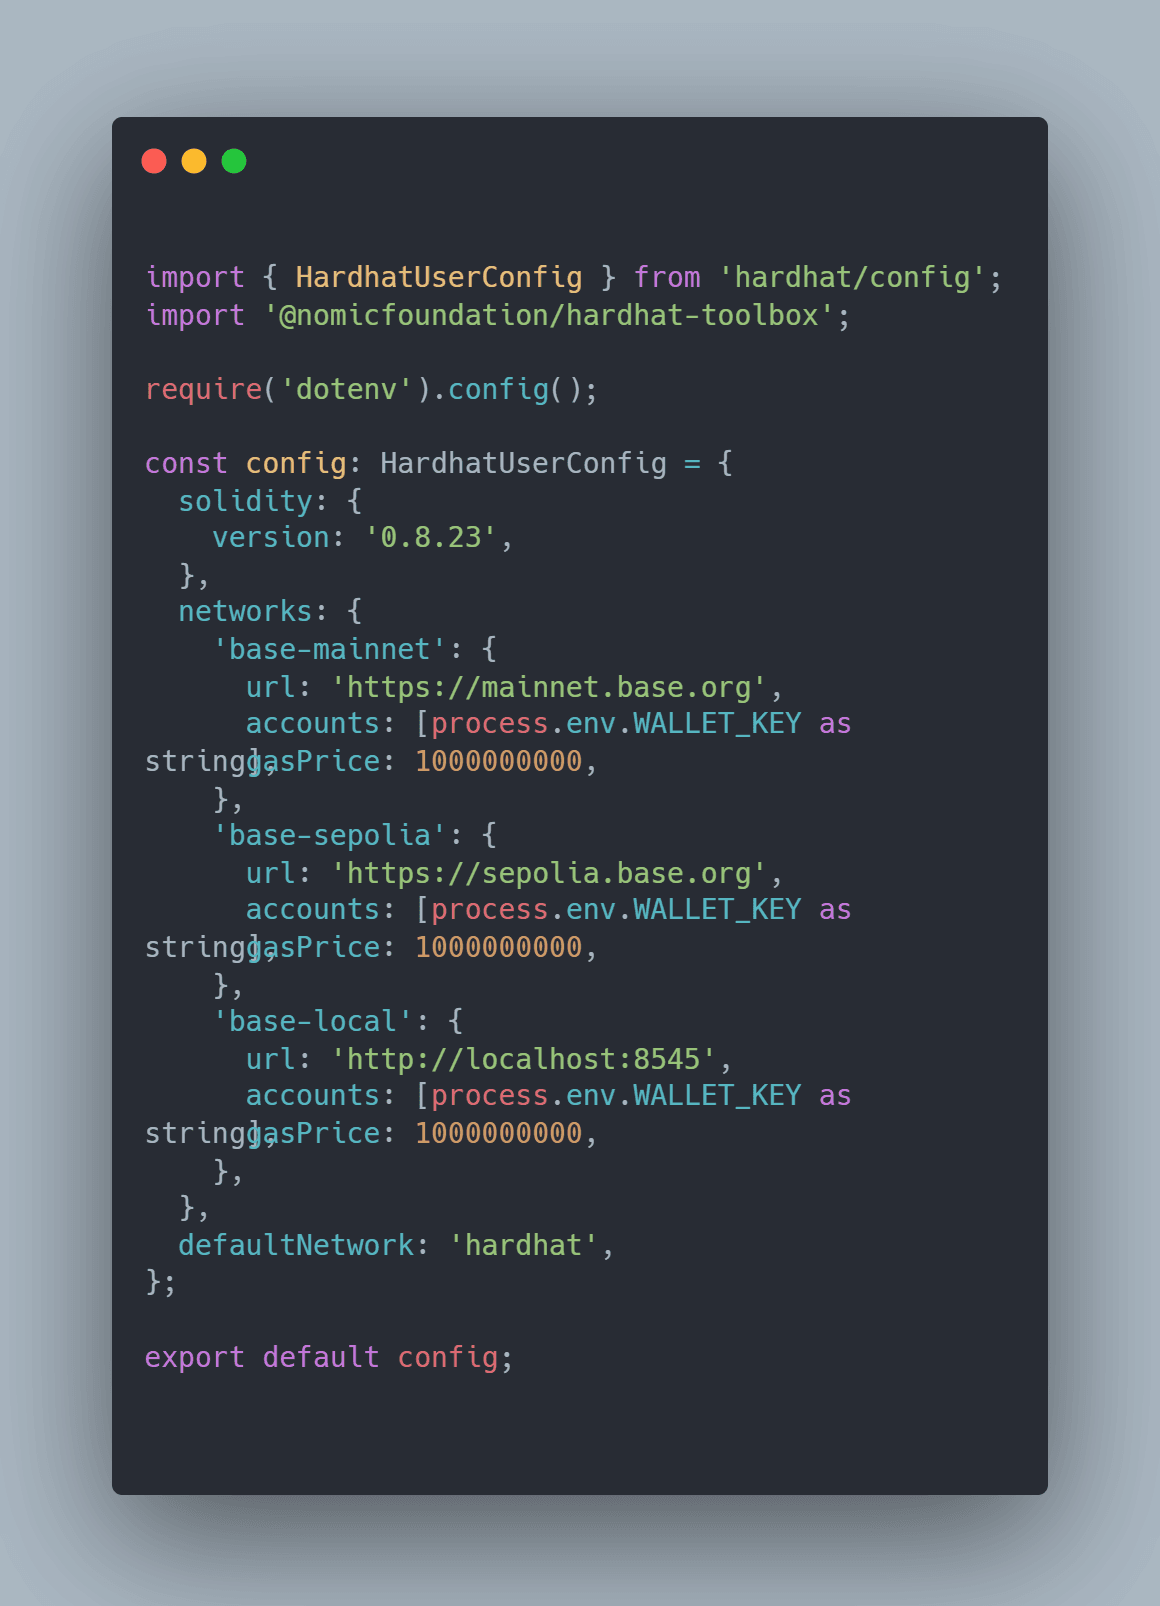
Add Base network configurations to hardhat.config.ts:
Install Hardhat toolbox and dotenv:
1npm install --save-dev @nomicfoundation/hardhat-toolbox dotenv
2
Create a
.envfile:1WALLET_KEY="<YOUR_PRIVATE_KEY>" 2Replace
<YOUR_PRIVATE_KEY>with your wallet's private key. Do not commit this to a public repository.
Compiling the Smart Contract
Write your smart contract:

Add OpenZeppelin Contracts library:
1npm install --save @openzeppelin/contracts
2
Replace contracts/Lock.sol with the new smart contract in contracts/NFT.sol.
Compile the smart contract:
1npx hardhat compile
2
Deploying the Smart Contract
Create a deployment script
scripts/deploy.ts:
Deploy to Base Sepolia test network:
1npx hardhat run scripts/deploy.ts --network base-sepolia
2
Note: Ensure your wallet has testnet ETH for this operation.
Verifying the Smart Contract
Configure Base Sepolia in
hardhat.config.ts:1etherscan: { 2 apiKey: { 3 "base-sepolia": "PLACEHOLDER_STRING" 4 }, 5 customChains: [ 6 { 7 network: "base-sepolia", 8 chainId: 84532, 9 urls: { 10 apiURL: "<https://api-sepolia.basescan.org/api>", 11 browserURL: "<https://sepolia.basescan.org>" 12 } 13 } 14 ] 15} 16Verify the contract:
1npx hardhat verify --network base-sepolia <deployed address>
2
Replace
<deployed address>with the contract address returned from the deployment script.
Interacting with the Smart Contract
Once verified, you can interact with your contract on Basescan. Connect your wallet and use the Read Contract and Write Contract tabs to interact with the deployed contract.
Wrapping Up
And there you have it! You've successfully deployed and interacted with your first smart contract on Base Sepolia. The journey to becoming a blockchain wizard starts with a single contract, and now you have the basics down. Whether you're building the next big decentralized app or just experimenting, you've taken a big step into the exciting world of Web3.
As you continue writing smart contracts and developing your projects, it's crucial to avoid common mistakes, especially when deploying to production. Errors can be costly and risky. To help safeguard your work, consider using tools like QuillShield, an AI agent developed by us to spot vulnerabilities in smart contracts. It's a valuable resource for ensuring your code is secure and robust.
So, what's next? Keep exploring, keep coding, and most importantly, have fun! The blockchain is your playground, and the possibilities are endless.
Happy coding!
Contents


