Uniswap v4
Liquidity Mechanics in Uniswap v4 Core
Explore Uniswap v4 core liquidity mechanics, including hooks, singleton design, flash accounting & gas optimizations for decentralized trading.
To understand the significance of concentrated liquidity, we must first examine the limitations of Uniswap v2's approach. In v2, liquidity providers deposited their tokens into pools where liquidity was distributed uniformly across the entire price curve from zero to infinity.
Inefficiency Challenge
Infinite price curve approach created several critical problems:
Capital Inefficiency: Liquidity in v2 pools was distributed infinitely that allowing trades at any price from 0 to infinity. This made capital extremely inefficient. For example, the historical price range of ETH spans from $0.75 to $4,800, yet v2 provided liquidity for scenarios where ETH might trade at $50,000 or $0.01 price ranges that would never realistically be reached.
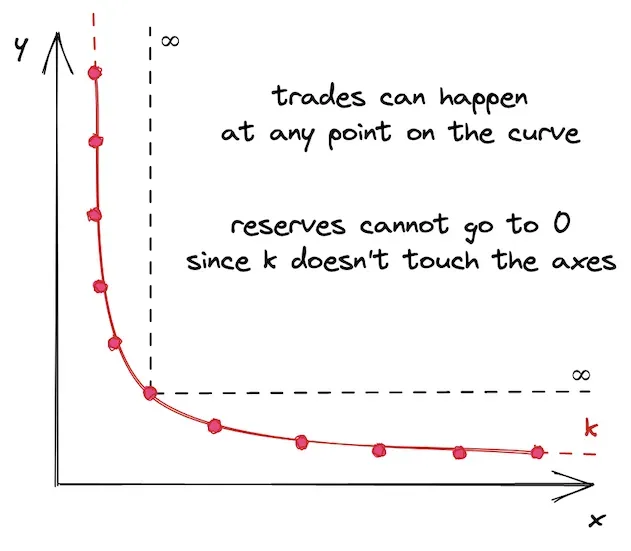
- Poor Stablecoin Trading: Pegged tokens like USDC and USDT require high liquidity to maintain their 1:1 peg, regardless of trade size. v2's general AMM algorithm wasn't well-suited for stablecoin trading, which is why alternative AMMs like Curve dominated this market.
- Wasted Liquidity: Most of the liquidity sat unused in price ranges far from current market prices. If ETH was trading at $2,000, providing liquidity for ETH at $10,000 was essentially pointless yet that's exactly what V2 forced LPs to do.
- Higher Slippage for Traders: With liquidity spread thinly across all price ranges, traders experienced higher slippage, especially for larger swaps. The lack of concentrated liquidity around current market prices meant that even moderate-sized trades could move prices significantly.
How Concentrated Liquidity Works?
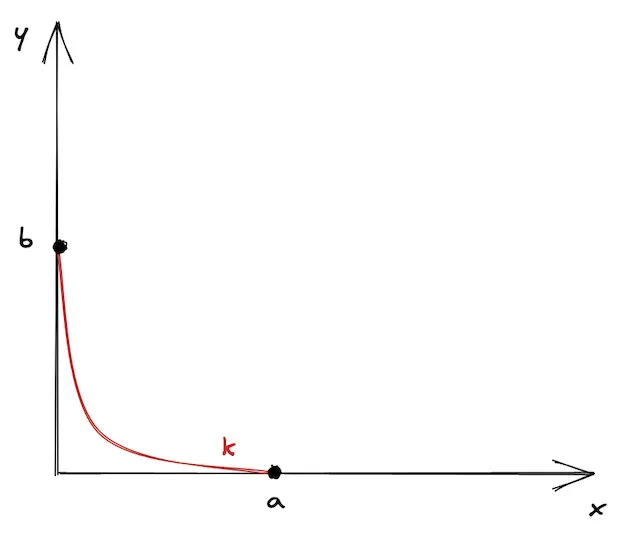
Instead of spreading liquidity uniformly, v3 and v4 enable LPs to:
- Select Custom Price Ranges: LPs can choose specific price boundaries (between points 'a' and 'b') where they want their liquidity to be active
- Concentrate Capital Strategically: Multiple LPs can overlap their ranges, creating deep liquidity pools around expected trading ranges
- Activate and Deactivate Automatically: When prices move outside an LP's range, their liquidity becomes inactive until prices return
In v3/v4, however, the liquidity is spread around more like this:
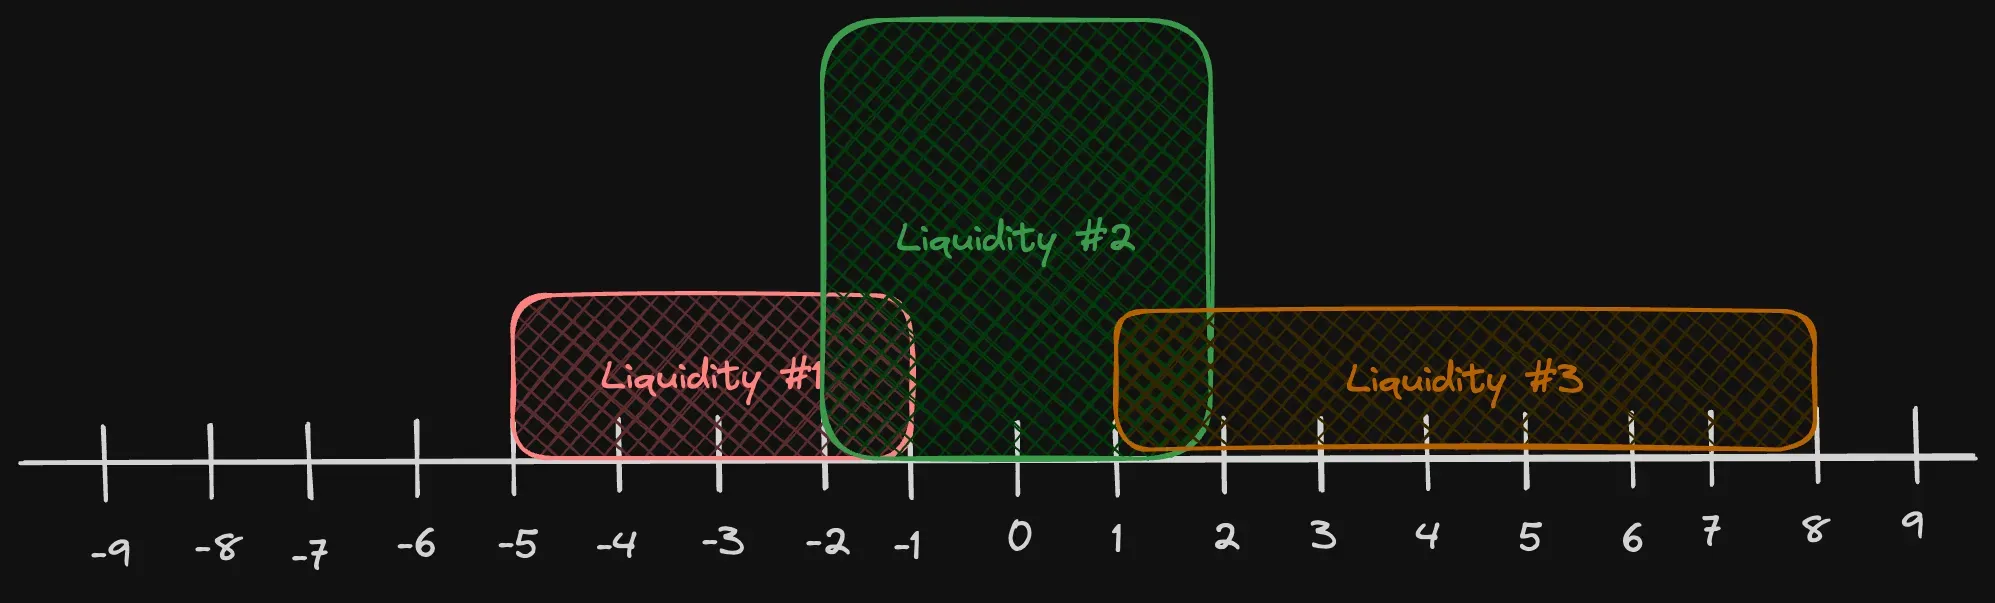
LPs choose a "price range" where they add their liquidity. These "liquidity buckets" can overlap with each other, increasing the total amount of liquidity available with a subsection of their price ranges - and can be non-overlapping as well.
In a real example from an ETH/USDC pool from Uniswap v3/v4, we can see the spread of liquidity looks like this:

Price Range Mechanics
When you provide liquidity to a specific price range, you're essentially creating a finite curve between two points rather than an infinite one. This has several important implications:
- Range Depletion: When the price moves to either boundary of your range, the pool becomes depleted one of the token reserves becomes zero, and buying that token becomes impossible within that range. and there is liquidty available but there is ditamd between two liquidity that
- Price Slippage Between Ranges: When the current price range gets depleted during a trade, the price slips into the next available price range. If no next range exists, the trade is only partially fulfilled.
- Limit Order Functionality: An interesting side effect of this mechanism is that price ranges can function as limit orders, automatically executing when prices reach specific levels.
How to create new pool?
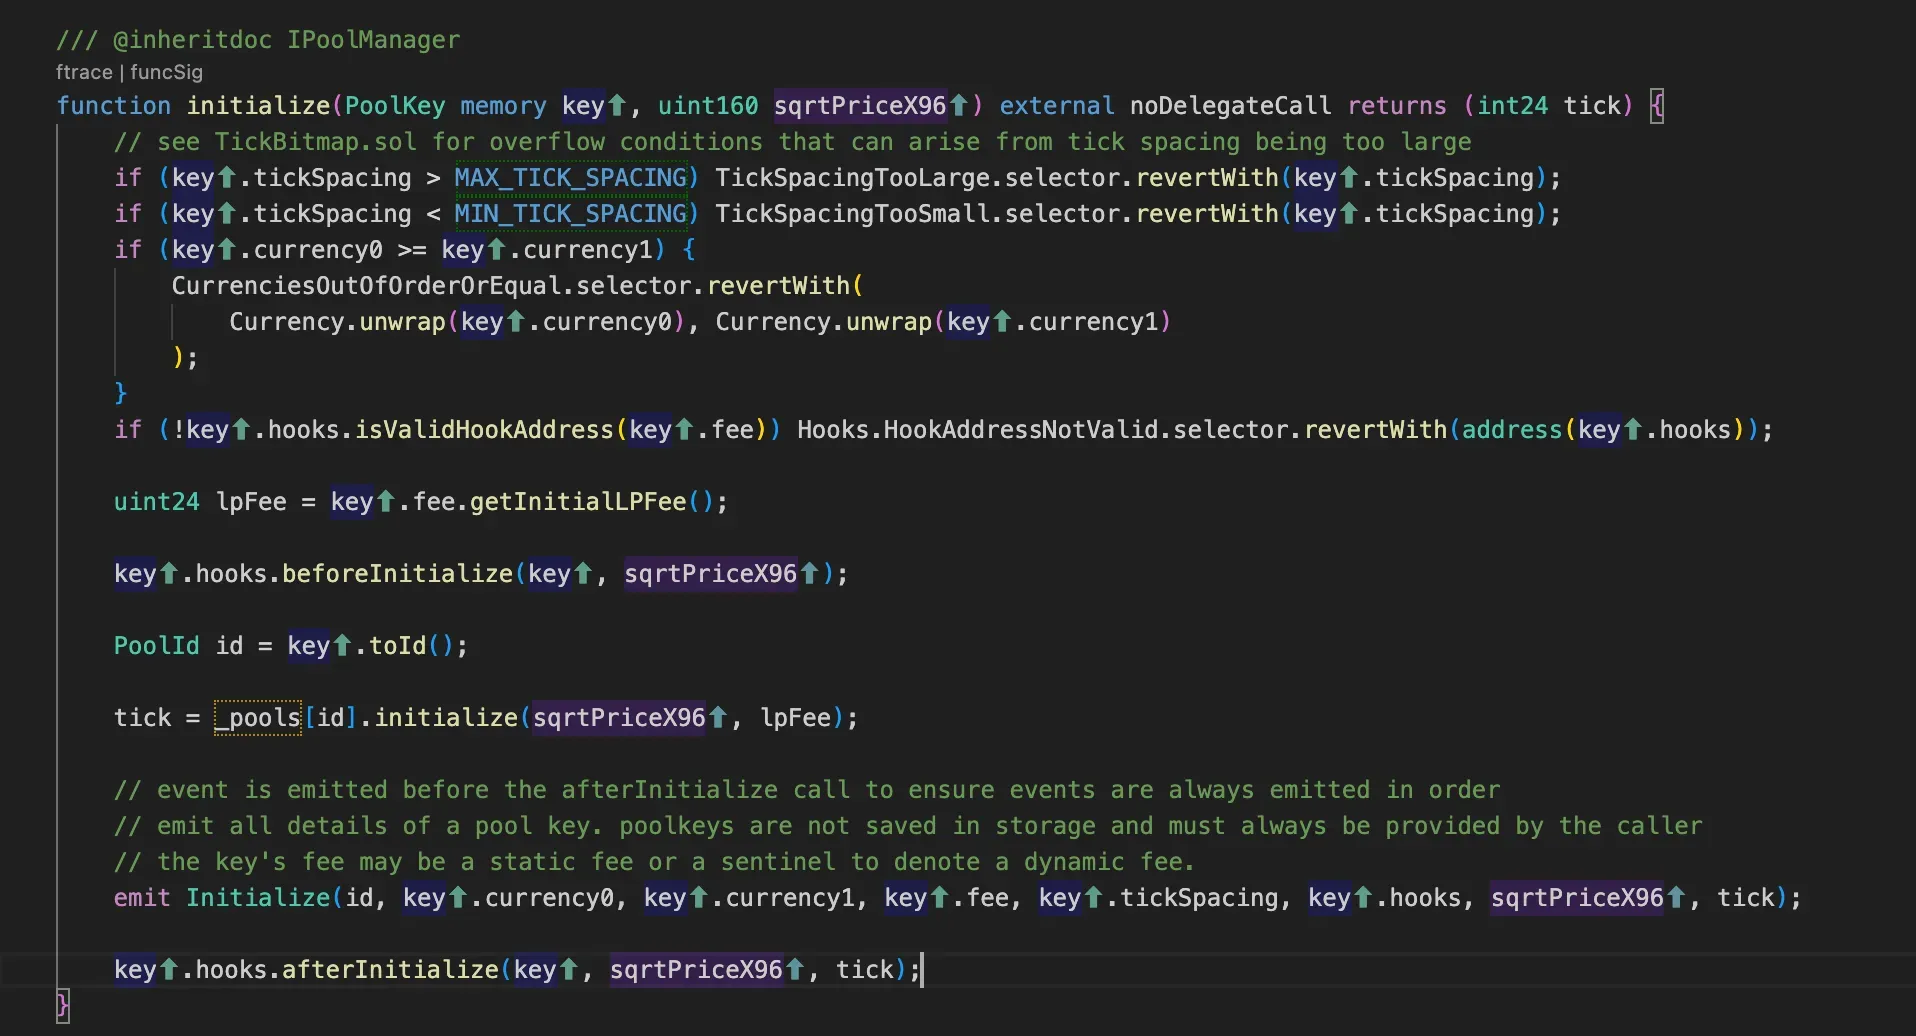
Uniswap V4 uses a Singleton pattern (all pools in one contract) and does not have a traditional factory like v3. Instead, pools are created directly in the PoolManager contract.
However, note that in v4, the PoolManager itself acts as a factory for pools. You create a new pool by initializing it with a unique set of parameters (token0, token1, fee, tickSpacing, hooks).
Unlike Uniswap v3, where users had to choose from 4 predefined fee tiers (0.01%, 0.05%, 0.3%, and 1%), Uniswap v4 allows pool creators to set any custom fee tier they want. This gives much greater flexibility in fee and liquidity strategies compared to the restrictions in v3.
Steps to create a new pool in Uniswap v4:
- Define the pool parameters (PoolKey struct).
- Call
initializeon the PoolManager with the initial sqrtPriceX96.
After initializing the pool, the pool is created but has zero liquidity. Now, the first liquidity provider must add liquidity.
However, note: the first liquidity provider must set the initial price correctly (which is already set by the initialize call). The liquidity is added by minting a position that covers the current price.
How modifyLiquidity Function Works?

- User uses a periphery contract to initiate the liquidity modification.
- Periphery contract unlocks the
PoolManagerwhich then does a callback tounlockCallback - Inside the callback, the periphery contract triggers
modifyLiquidityon the manager. - The manager ensures the pool is valid and is initialized.
- Manager figures out if the modification is an addition or removal of liquidity.
- Manager checks if the associated
beforehook needs to be called based on the hook's address - and calls it if necessary. - The actual liquidity modification logic runs and the balance delta is calculated
- The
ModifyLiquidityevent is emitted. - The manager checks if the associated
afterhook needs to be called, and calls it if necessary. - The balance delta is returned to the periphery contract.
- The periphery contract settles all balances (by transferring tokens or minting/burning 6909 claims)
unlockCallbackfinishes execution, Manager ensures no pending non-zero deltas, and locks itself.- Transaction is complete.
Now, providing initial liquidity: We must mint a position that includes the current price. The current price is the one we set during initialization.
Core Math Behind Liquidity Modification
In Uniswap v3/v4, liquidity providers (LPs) must define a price range (tickLower and tickUpper) where their capital is active. Let’s break down how to calculate these ticks for an ETH/USDC pool where:
- Current price: 1 ETH = $5000 USDC
- Liquidity range: $4545 (lower) to $5500 (upper)
Step 1: Understand the Tick-Price Relationship
Uniswap v3 uses the formula:
1Price = 1.0001^tickEach tick represents a 0.01% change in price.
To convert between price ↔ tick, use logarithms:
1tick = log₁.₀₀₀₁(price)
Step 2: Calculate Ticks for Your Price Range
- Current Price: $5000/ETH
1tickCurrent = log₁.₀₀₀₁(5000) ≈ 85176- Lower Price Bound: $4545/ETH
1tickLower = log₁.₀₀₀₁(4545) ≈ 84222- Upper Price Bound: $5500/ETH
1tickUpper = log₁.₀₀₀₁(5500) ≈ 8602
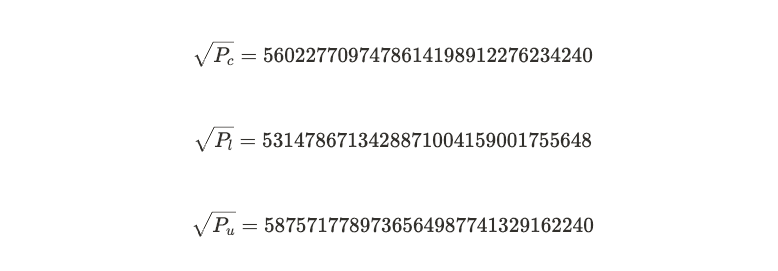
Q64.96 Number Format
Last thing to note here is that Uniswap uses Q64.96 number to store P. This is a fixed-point number that has 64 bits for the integer part and 96 bits for the fractional part.
In our above calculations, prices are floating point numbers: 70.71, 67.42, and 74.16. We need to convert them to Q64.96.
Step 3: Adjust for Tick Spacing
Uniswap pools have a tickSpacing depending on the fee tier.
For example, a 0.3% fee tier pool has tickSpacing = 60.
- Rounded Lower Tick:
184222 ÷ 60 = 1403.7 → floor(1403.7) = 1403
21403 × 60 = 84180- Rounded Upper Tick:
186029 ÷ 60 = 1433.8 → ceil(1433.8) = 1434
21434 × 60 = 86040
✅ Final Tick Range:
1tickLower = 84180  (~$4543)
2tickUpper = 86040  (~$5502)
Step 4: Verify Price Range
Convert ticks back to price to confirm:
- Lower Price ≈
1.0001^84180 ≈ $4543 - Upper Price ≈
1.0001^86040 ≈ $5502
This confirms your liquidity will only be active between ~$4543 and ~$5502.
Now Lp provider call the modifyLiquidity function in PoolManager that check some condition and before and after here the hooks to build we talk in next blog no it, and then call internal function modifyLiquidity of pool.
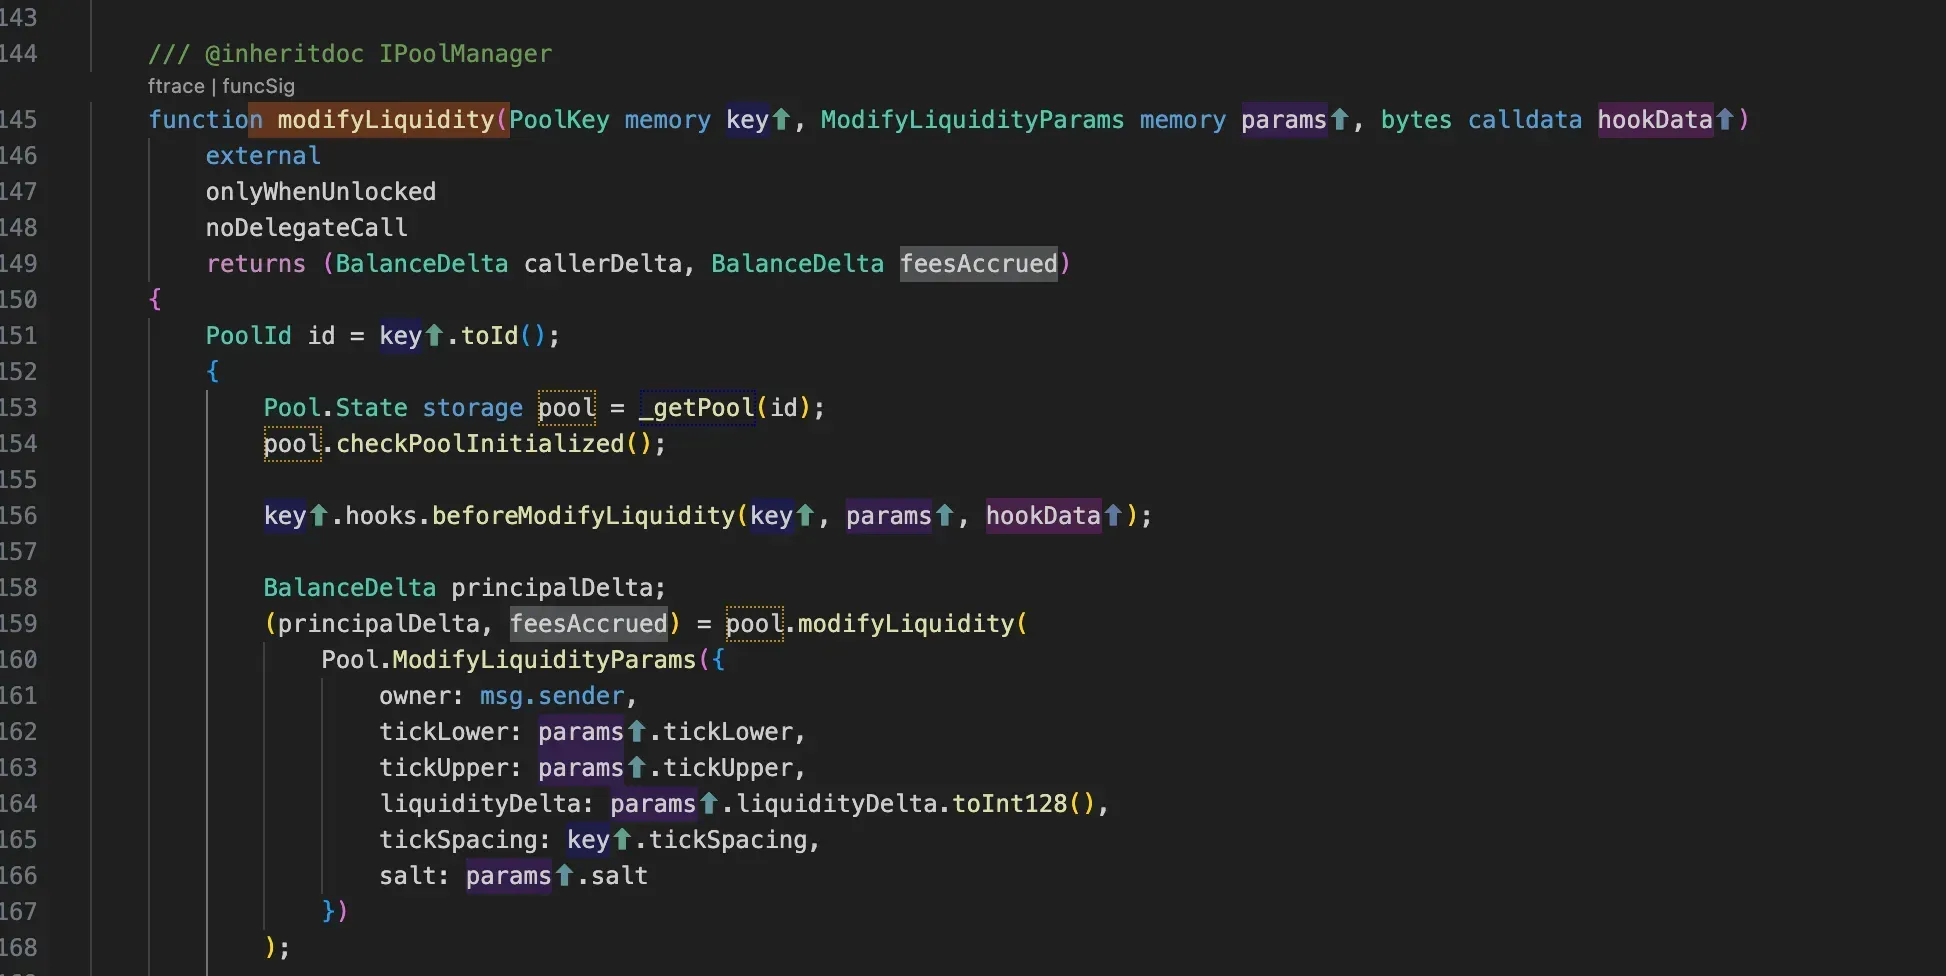
Modifyliquidity in the pool is the bigger function; let's understand it by breaking it down into several parts.

If the user adds liquidity more than 0, this condition applies, and the following state should be updated.

- first the
updateTickinternal function that liquidityDelta != 0: Only execute if there's an actual change in liquidity (positive for adding, negative for removing)updateTick(self, tickLower, liquidityDelta, false):- Updates the lower tick of your position
falseindicates this is the lower bound- Returns whether the tick "flipped" (changed from initialized to uninitialized or vice versa)
- Returns the new gross liquidity at this tick
updateTick(self, tickUpper, liquidityDelta, true):- Updates the upper tick of your position
trueindicates this is the upper bound- Same return values as lower tick
updateTick function is responsible for:
- Adjusting liquidity at specific price ticks when positions are modified
- Tracking fee accumulations around tick boundaries
- Managing tick initialization state changes
- Calculating net liquidity changes for efficient swap routing
When positions are changed, this internal function manages modifying liquidity at particular price ticks while preserving precise fee tracking and effective storage operations.
UpdateTick carefully updates the tick's liquidity values whenever liquidity providers add or remove funds. It also checks to see if the initialization state of the tick has changed, which is crucial for accurate fee accounting and swap routing.
In order to prevent underflows, the function first loads the current tick data and uses safe mathematical operations to determine the new liquidity amount. Its capacity to identify tick transitions between initialized and uninitialized states, which influences the tracking of fees at these price points, is a crucial feature. To guarantee appropriate fee distribution for newly initialized ticks, the function logs the current global fee accumulations. Additionally, it manages the intricate computation of net liquidity differently for upper and lower ticks, which is necessary for effective swap execution.
What makes updateTick particularly innovative is its optimized storage approach. Using low-level assembly, it efficiently packs both gross and net liquidity values into a single storage slot, significantly reducing gas costs. This optimization is especially valuable given how frequently these operations occur during normal pool activity. The function's careful design ensures liquidity providers get accurate fee accounting while maintaining the protocol's high performance standards, making it a cornerstone of Uniswap V4's improved concentrated liquidity model.
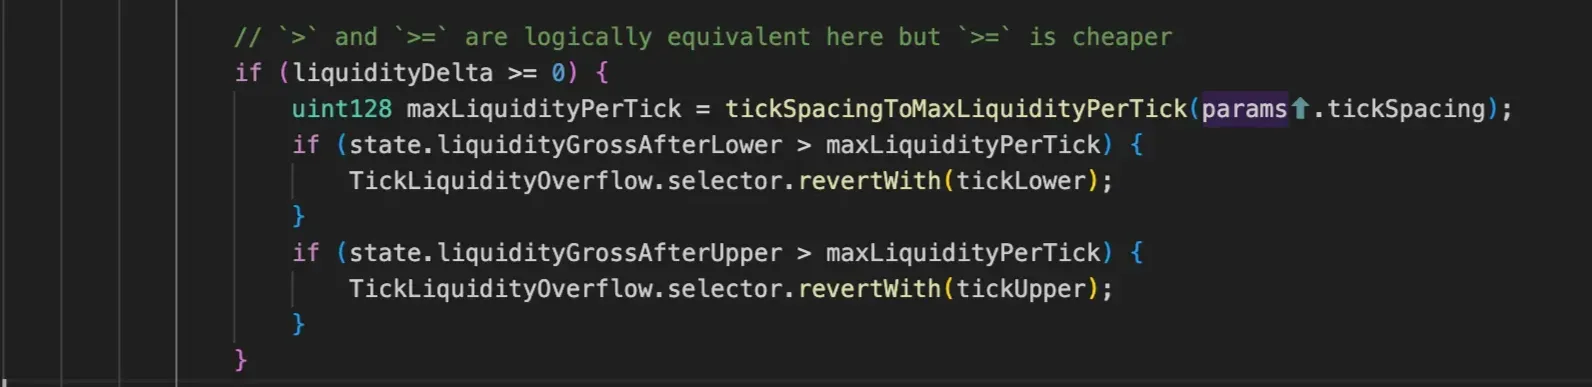
Actually a liquidity change (liquidityDelta >= 0), and if so, it calculates the maximum liquidity that can be safely stored at any single tick based on the pool's tick spacing. This maximum is determined by the tickSpacingToMaxLiquidityPerTick function, which ensures that even with the densest possible tick spacing, the liquidity values won't overflow the uint128 storage type.
The protocol then performs two critical checks on the gross liquidity after the proposed update. First, it verifies that the lower tick (tickLower) won't exceed the maximum liquidity limit by comparing state.liquidityGrossAfterLower against maxLiquidityPerTick. If this check fails, the transaction reverts with a TickLiquidityOverflow error, preventing the liquidity addition. Similarly, it performs the same verification for the upper tick (tickUpper) by checking state.liquidityGrossAfterUpper.
This overflow protection is essential because Uniswap uses fixed-point arithmetic with uint128 for liquidity values, and allowing overflow could lead to catastrophic failures where liquidity calculations become incorrect, potentially allowing users to drain the pool or causing other serious vulnerabilities.
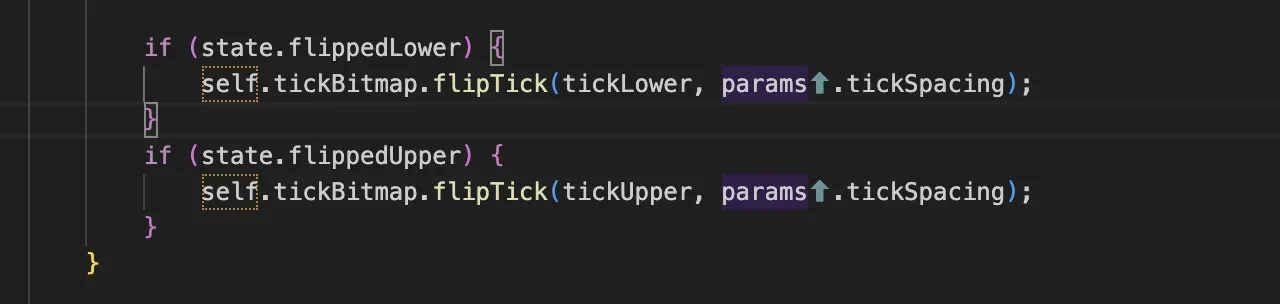
This code snippet manages the tick bitmap in Uniswap, which is a critical gas optimization mechanism. When liquidity positions are created or removed, certain ticks may "flip" their state - transitioning from having no liquidity to having liquidity, or vice versa. The bitmap efficiently tracks which ticks are initialized (have liquidity) using individual bits rather than expensive storage slots.
The conditional checks if (state.flippedLower) and if (state.flippedUpper) ensure that the bitmap is only updated when necessary. When a tick flips, the flipTick function toggles the corresponding bit in the bitmap, which helps the protocol quickly identify which ticks are active during price movements and swaps.
In your example as the first depositor, both your lower tick (4545) and upper tick (5500) will flip from uninitialized to initialized, causing both conditions to be true. This means the bitmap will be updated to mark both ticks as active, which costs additional gas for the initialization but creates the infrastructure for efficient future operations.
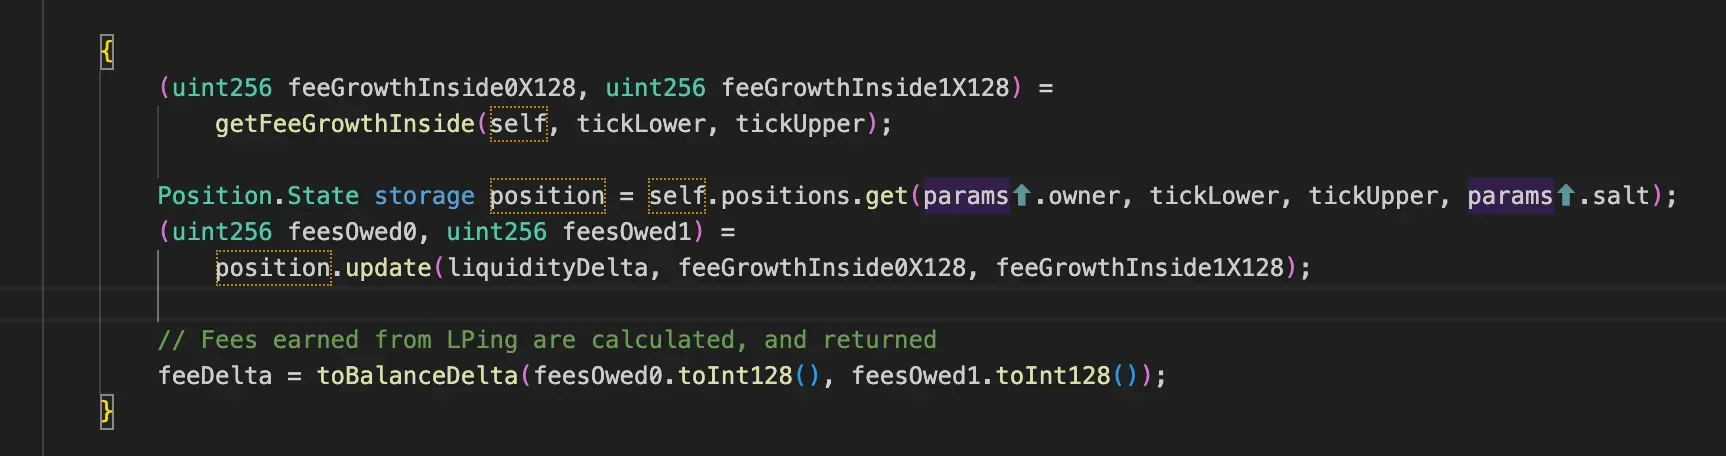
- Fee Growth Tracking:
- The contract tracks fees accumulated by liquidity providers (LPs) using
feeGrowthInsidevalues - These are stored as Q128.128 fixed-point numbers (hence the X128 suffix)
- There are separate values for token0 (
feeGrowthInside0X128) and token1 (feeGrowthInside1X128)
- The contract tracks fees accumulated by liquidity providers (LPs) using
- Position Management:
self.positions.get()retrieves a specific liquidity position using:- Owner address
- Lower tick bound
- Upper tick bound
- Salt (for position differentiation)
- Fee Calculation:
position.update()calculates the fees owed to this position based on:liquidityDelta- Change in liquidity (can be positive or negative)- The fee growth values inside the position's tick range
- Return Value:
- The owed fees are converted to a balance delta (change in token balances)
toBalanceDelta()packages the fee amounts into a structured return value
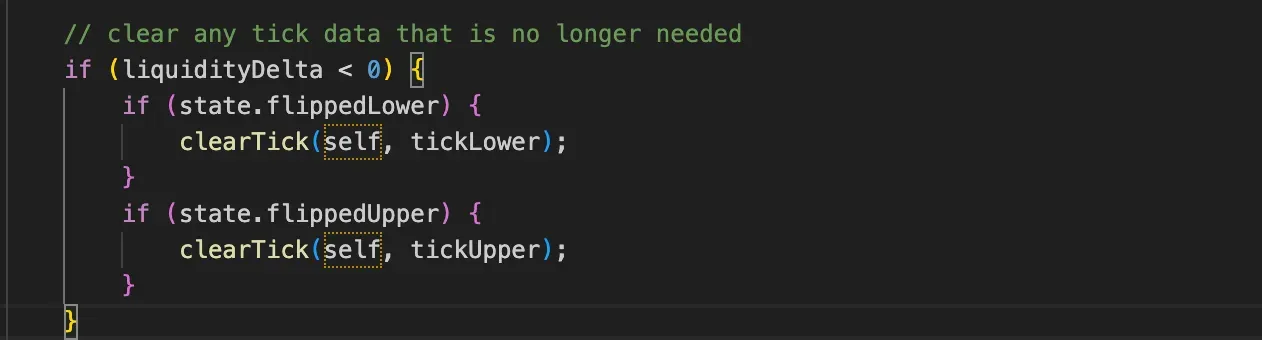
This would typically appear in functions that modify liquidity positions (like adding/removing liquidity), where:
- The contract first updates tick states
- Then cleans up unused ticks to save storage space
- This pattern helps reduce the blockchain storage burden and gas costs for users
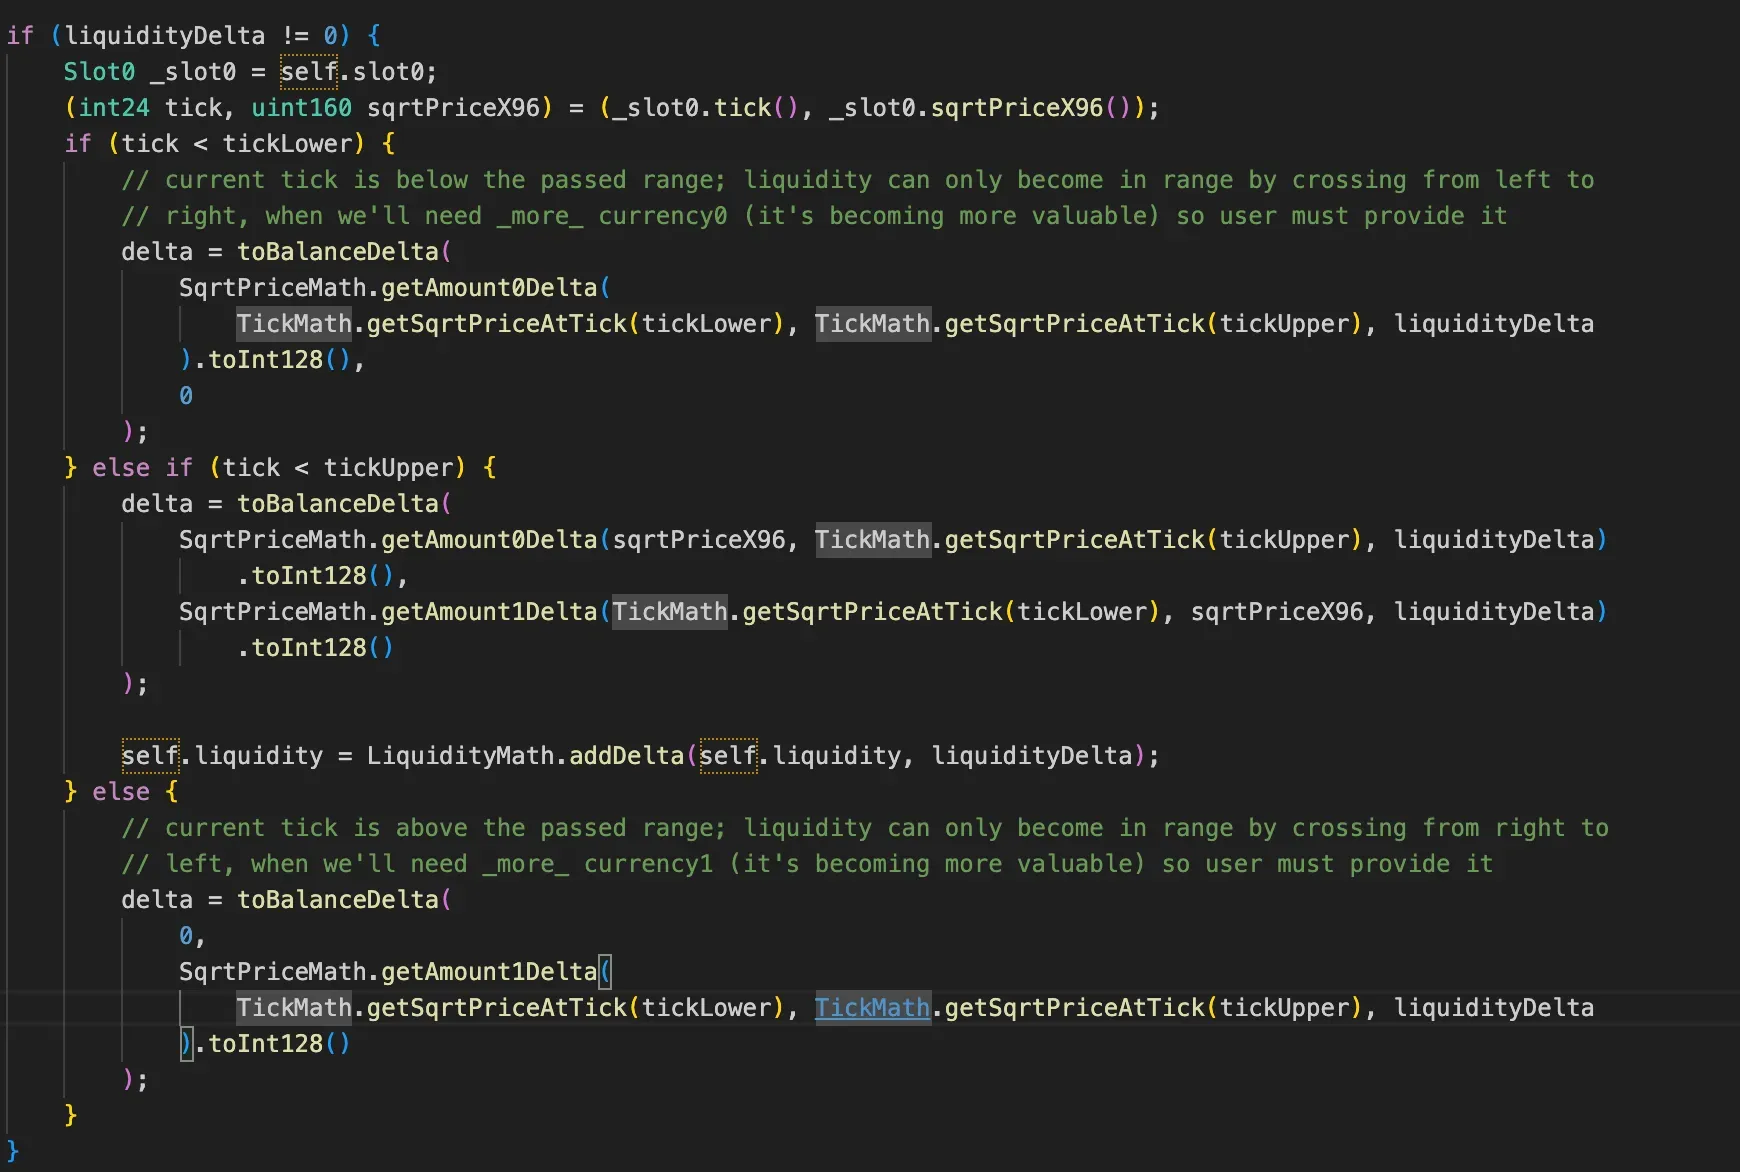
- Price-Position Relationship:
- Below range → Only
token0required - Within range → Both tokens required
- Above range → Only
token1required
- Below range → Only
- Token Amount Calculation:
- Uses
SqrtPriceMathfor precision (Q64.96) getAmount0Delta(): Computes token0 amountgetAmount1Delta(): Computes token1 amount
- Uses
- Liquidity Update:
- Uses
LiquidityMath.addDelta()for safe signed/unsigned conversion - Prevents overflow/underflow vulnerabilities
- Uses
- Gas Optimization:
- Skips calculation if
liquidityDelta == 0 - Uses tick-based math instead of full price recalculation
- Skips calculation if
Similar to Uniswap v2 - v3 still required that each pool was its own smart contract deployed through the UniswapV3Factory contract. This made certain actions such as creating a new pool, or doing a multi-hop swap, expensive actions.

Uniswap v4 Disign:
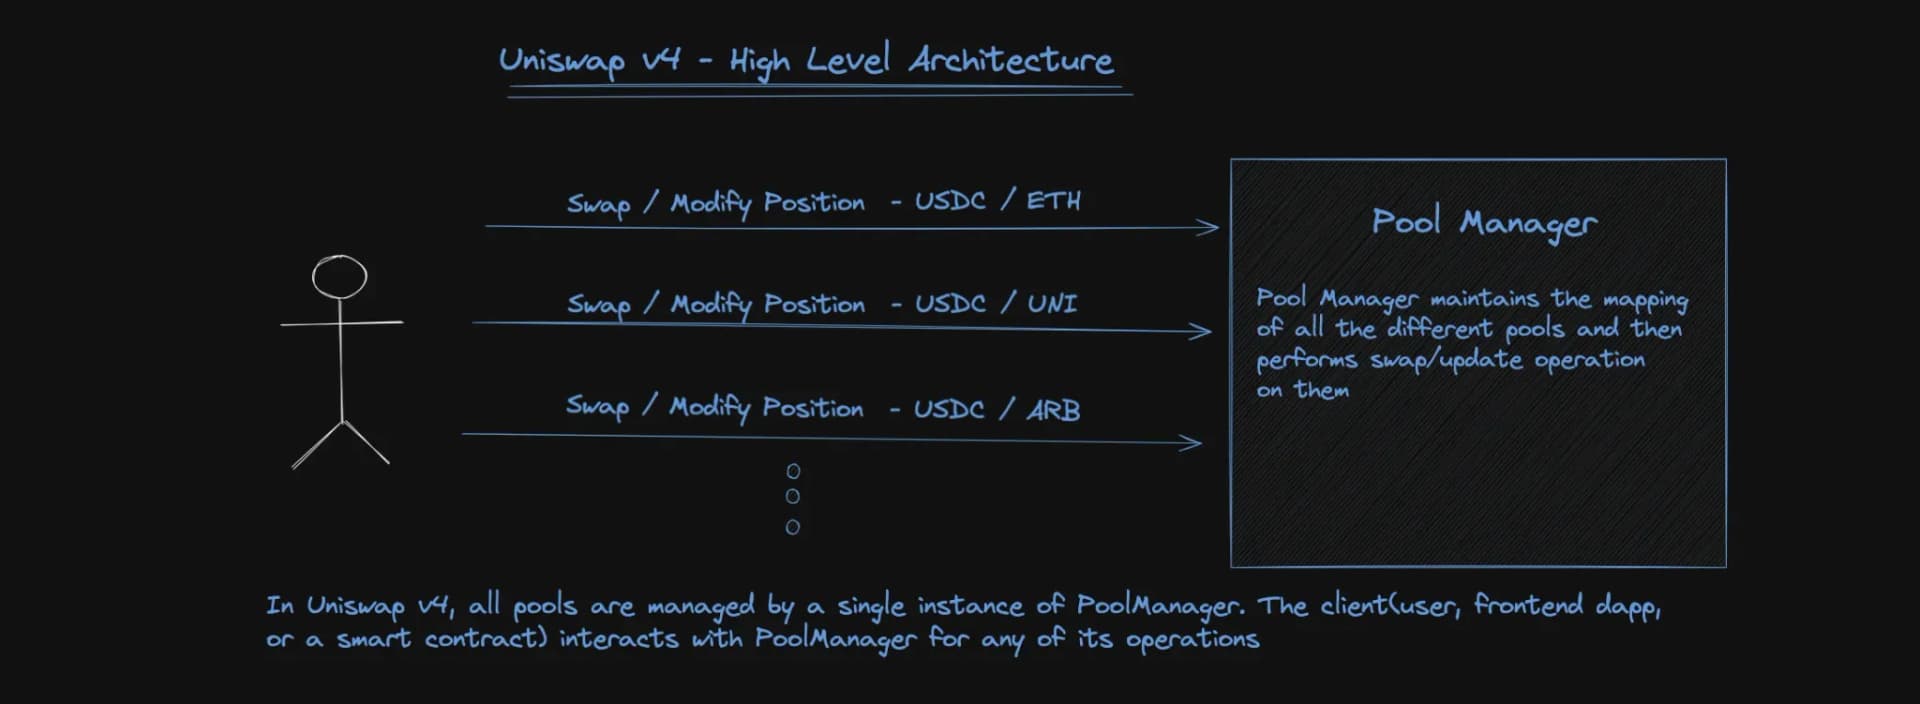
As shown in the image above, there now exists a single PoolManager smart contract. This PoolManager contains the mapping to identify all pools in existence - but they all also live within the PoolManager contract itself instead of being their own contracts.
This design is possible because pools now are implemented as Solidity libraries. This is a bit abstract - so let's see how it is in code
1// Pool Library
2library Pool {
3	function initialize(State storage self, ...) {
4      ...
5    }
6
7  	function swap(State storage self, ...) {
8      ...
9    }
10
11  	function modifyPosition(State storage self, ...) {
12      ...
13    }
14}
15
16// PoolManager
17contract PoolManager {
18
19	using Pools for *;
20	mapping (PoolId id => Pool.State) internal pools;
21
22	function swap(PoolId id, ...) {
23		pools[id].swap(...); // Library Call
24	}
25}
Unlike v3 where the pools mapping final nested value pointed to a contract address - in v4 the pools mapping points to a Pool.State struct. Using the Pool library on this struct, all the AMM logic gets encapsulated within the PoolManager contract directly requiring no external function calls.
The Pool.State struct itself contains mostly the same information as a Uniswap v3 Pool would contain. In v3, the pool state was stored per-contract as storage values and accessible through various view functions - now they're just part of the struct.
For example, in Uniswap v3 - view functions like slot0() existed on each Pool contract to return some crucial information
1interface IUniswapV3PoolState {
2	function slot0() external view returns (
3		uint160 sqrtPriceX96,
4		int24 tick,
5		uint16 observationIndex,
6		uint16 observationCardinality,
7		uint16 observationCardinalityNext,
8		uint8 feeProtocol,
9		bool unlocked
10	);
11
12	// Other view functions for a few other things
13}
14
The same exists in Uniswap v4, just as getter/setter functions you access differently from the PoolManager.
So - to conclude - v4 has a singleton design where all Pools and their logic becomes encapsulated within a single PoolManager contract, made possible by offloading most of the logic to libraries and calling functions through those libraries rather than deploying new contracts entirely for each pool.
Having explored how Uniswap v4 handles InitializePool and ModifyLiquidity, along with key concepts like tick math, we’ll next dive into the swap function. Stay tuned for the upcoming blog!


